You can use the Interaction Manager to manage interactions between slicers, visuals, targets, dynamic web panels, and so on. You can add, remove, and edit interactions, add and delete slicers, and view slicer settings from this panel. The interactions for the whole slide are shown as a grid; with checkboxes indicating an interaction between each pair of content items.
Note: If you want to create interactions between content items that appear on different slides, you can either use targets to mediate the interaction between visuals, or create an interaction between a visual and slicer in the hidden slicers panel.
- Click here to learn more about the runtime effects of interactions
Open the Interaction Manager
You can open the Interaction Manager (purple arrow) from either the Presentation ribbon (blue arrow) or the Slide ribbon (yellow arrow):

Alternatively, you can open the Interaction manager by selecting an interaction arrow on the canvas, and right-clicking Edit Interaction. Note: If your arrow is bidirectional (it represents interactions between two visuals where either can act as the source), there will be two edit options to select, one for each interaction.
Create and remove interactions
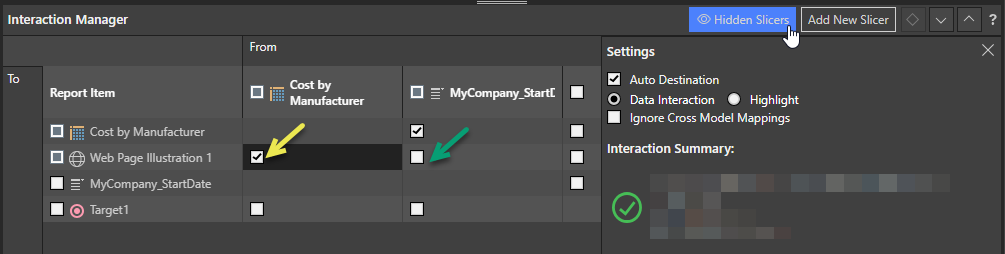
Interactions can be added or deleted using the Interaction Manager, by selecting or clearing the relevant checkbox:
- When the checkbox is selected (yellow arrow), there is an interaction between the content item in the From column and the content item in the To row. This means that your user can select the item in the From column (Grid) to affect the item in the To row (Dynamic web page) at runtime and see an interaction between those items.
- When the checkbox is clear (green arrow), there is no interaction between the two content items. In the example case, selecting an option from the slicer will not affect the Dynamic web page at runtime.
Note: When the cell representing the interaction is selected in the Interaction Manager, the Settings panel opens.
Tip: You can click Hidden Slicers to show any hidden slicers (slicers that are not visible on this slide) in the Interaction Manager. For more information, see Hidden Slicers.
Interaction types
Cross-visual interactions
Where the interaction connects two visuals (one in the From column and one in the To column), it enables a cross-visual interaction in the presentation when viewed at runtime:
With the cell at the intersection selected (yellow arrow):
- Select the Auto Destination checkbox to enable the interaction at runtime. Clear this checkbox to disable the interaction at runtime, but leave the interaction in place. When Auto Destination is enabled, you can select the required interaction type from the Settings:
- Data Interaction: Enable cross-filtering between the items with the interaction. This filtering can be triggered at runtime by clicking visual elements, dragging or otherwise multi-selecting elements, or using Interact on the context menu.
- Sync: Enable synchronization between the two items. For example, eliminating a data point on one visual at runtime causes the same data point on the other visual to also be eliminated if they are connected by a sync interaction.
- Highlight: Enable cross-highlighting between two items.
- Select the Ignore Cross Model Mappings checkbox if you don't want cross-model mappings to be used.
For more information about the effect of these options at runtime, see Present interactivity at runtime
Tip: You can pin the Settings panel in the Interaction Manager to keep it open while you work. Click the Pin icon (blue arrow above) in the header to pin the panel. The panel will remain open until you unpin it.
Slicer interactions
Where the interaction connects a slicer and another content item (the source slicer in the From column and the object it affects in the To column) it allows the value selected from the source slicer to affect target visuals, illustration assets, and even other slicers when viewed at runtime:
Which Settings are shown for slicer interactions depends on the interaction's target content item.
Slicer to visual interactions
With the cell at the intersection between a slicer and visual selected (yellow arrow), the basic options are offered in the Settings:
- Select the Auto Destination checkbox to enable the interaction at runtime. This results in the slicer filtering the target content item when your user selects an option at runtime. Clear this checkbox to disable the interaction at runtime, but leave the interaction in place.
- Select the Ignore Cross Model Mappings checkbox if you don't want cross-model mappings to be used.
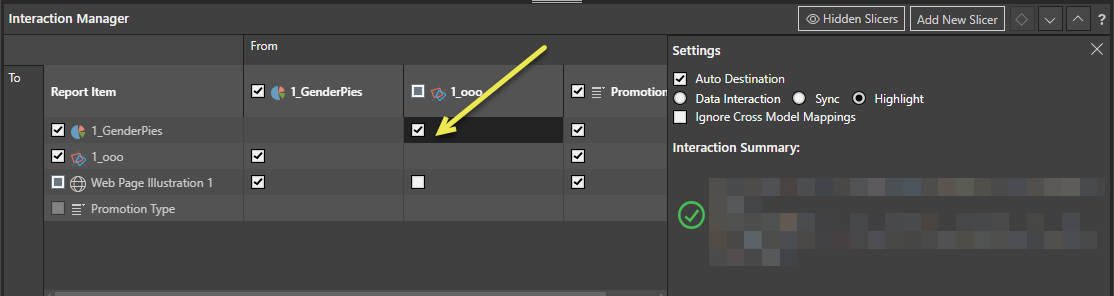
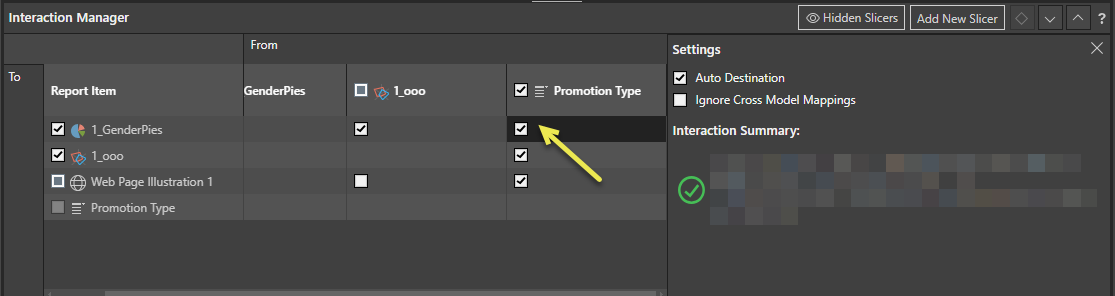
Cross-slicer interactions
Where the interaction is between two slicers (as opposed to a slicer and a visual, for example), it is a cross-slicer interaction. Cross-slicer interactions enable "cascading filters," where runtime users can select a value on one slicer to affect the values on the next slicer. For example, if you have cross-slicer interactions from a Product Category hierarchy and to a Product Sub Category hierarchy, your user could select a category from the first slicer to limit or highlight the options on the second slicer to those that are associated with their selected Product Category.
Note: This cascading filter could also be created in reverse; from the Product Sub Category and to the Product Category. In this case, a selection from the sub category list filters the product category list to show or highlight those options that could have offered the sub category. For example, if you select Bike Themed T-Shirts in the product sub category slicer, the product category slicer is filtered to show categories that the subcategory could belong to such as Bikes or Clothing.
Select the interaction (yellow arrow above) to configure Settings for a cross-slicer interaction:
- Select Data Interaction to enable cross-filtering of slicers. At runtime, the options on the target slicer only include those that satisfy the selection from the source slicer. For example, if the user selects Bikes as the category, then only the sub categories associated with bikes appear on the target slicer. For a worked example, see Cross-Filtering Slicers Example.
- Select Highlight to enable cross-highlighting of slicers. At runtime, all options are included on the target slicer but those that satisfy the selection from the source slicer are promoted to the top of the list and highlighted. For a worked example, see Cross-Highlighting Slicers Example.
Note: You cannot have a bidirectional data interaction on cascading slicers; that is, you can't have data interactions from Slicer 1 to Slicer 2 AND from Slicer 2 to Slicer 1.
Note: You can have a bidirectional highlight interaction and you can also have a highlight slicer where there is already a data interaction in the other direction.
- Click here for more information about cascading slicers in the Discover help
Interaction Manager buttons
From the top of the Interactions Manager:
- Toggle the Hidden Slicers button to show or hide any hidden slicers in the Interaction Manager.
- Click Add New Slicer to create a new slicer using the Advanced Slicer wizard.
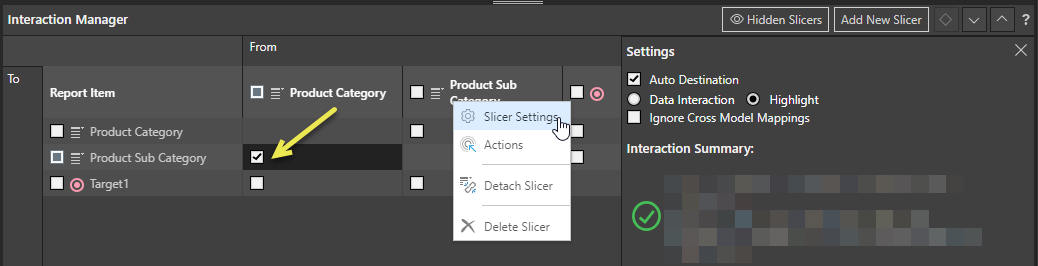
Slicer context menu
Right-click a slicer name in either the header row (see preceding) or first column to open its context menu:
- Slicer Settings: Open the Slicer Settings panel, where you can set the default behavior of the slicer, configure the type of elements used in the slicer, and so on.
- Actions: Open the Action panel and set up a guided process that allows users to trigger an effect based on their selections at runtime.
- Detach Slicer: Remove slicer interactions from other slides.
- Delete Slicer: Delete all instances of the selected slicer from the presentation.
Slicer with parameters
Where your interactions use parameters, or calculations that themselves make use of parameters, the Settings in the Interaction Manager associate the slicer with the parameter that underlies it.
- Click here for more information about slicers with parameter lists
Other fields and options
Interaction Warnings
If you add interactions to your canvas that are, say, in conflict with one another, an info warning will be shown alongside those interactions in the Interaction Manager:

- Hover your cursor over the icon to show a tooltip containing more information.
Cross-model interactions
Cross-model interactions connect content items from different data sources. This type of interaction is only supported "out-of-the-box" between models with the same structure. If you add interactions between items whose models have different structures (for example, different data types, formatting, hierarchies, and so on), the interactions will fail unless a Model Mapping is defined that maps the items in one model to items in the other.
- Click here for more information about cross-model mapping